Tuesday, August 9, 2011

Easy Yummy Pumpkin Cookies!

~Pumpkin Cookies~
What will you need:


  • Yellow Cake Mix (or spice cake)


  • 1 large can of pumpkin


  • Raisins, nuts and/or chocolate chips


  • Spices (if you use a yellow cake mix)


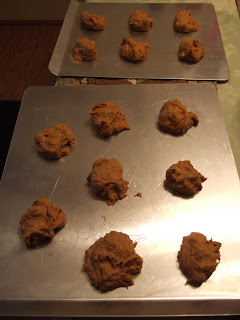
Mix 1 can of pumpkin with 1 box of cake mix.
Because I used a yellow cake mix (I didn't have a spice cake on hand) I added several shakes of cinnamin, ginger and cloves to my pumpkin and cake batter. Add your raisins, nuts and chocolate chips to taste in the batter.
Scoop spoonfuls of batter onto a cookie sheet (I LOVE airbake pans)


Bake at 350F for 18-20 minutes.


Yum!!!

Friday, July 29, 2011

Corn!


Today, has been a fun and a crazy busy day! I started my morning by mopping my floors, doing laundry, paying bills and accomplishing a million other things that a keeper at home does. :) I also decided that I needed to work on the corn that was ready and waiting for me in my garden. I went out and picked ear after ear after ear of corn, then sat down in a comfortable lawn chair and began to husk the cobs. I had fun throwing the husks into our firepit. I know why they call it sweet corn - by time I was done husking my hands were so sticky!


My husband loves frozen cream corn and since I had never frozen corn before, my wonderful mother-in-law came over to help me with the process! First we boiled the ears of corn, then we placed the corn cobs into a sink full of cold water to cool down before we started the process of cutting the corn.


My mother-in-law had a wonderful little tool that I had never seen or used before, but I'm totally getting it for next year! It's called a corn cutter and creamer and it looks like this:


You slide the cob across the blades and "ta da" the corn falls into the bowl beneath and you don't have to spend hours using a knife to cut your corn off the cob. You can get them off of Amazon for $7-10 - totally worth the money! :)

After we had all the corn peeled we scooped the corn into freezer bags and placed them in the freezer for a later date.

Here are some pictures from our morning:


Thursday, July 28, 2011

Cappuccino Muffins!

The finished product - YUMMY!!!!


Yikes! It's been a while since I've posted anything on this blog. I just haven't felt the greatest lately so grocery shopping, cooking/baking and anything to do with food just hasn't been very appealing. You see, I'm pregnant!!!


I'm almost 12 weeks along and I'm finally starting to feel less queasy. My monthly grocery shopping trip was pure misery as the sight of any food made me feel so sick, but I managed to get through it and spent less than $150! Yay!

I'm blessed to live close to my parents and younger siblings and my in-laws. My youngest siblings have been such a blessing as they helped me cook up my meat, boil noodles and help make several freezer meals which have come in very handy over the past several weeks. I totally agree with whoever came up with the idea of preparing ahead of time when you're in your very early weeks of pregnancy - because having something to just pull out of the freezer when you're not feeling is totally WONDERFUL!

Yesterday, I felt really good and actually managed to do some baking! I was quite pleased and very happy with myself since it had been weeks since I had even wanted to see a recipe book. I made cappuccino muffins from off the Taste of Home website (I love their recipes!).

You can go here to get the recipe: http://www.tasteofhome.com/Recipes/Cappuccino-Muffins
(for some reason I couldn't copy/paste the list of ingredients without my computer freezing up on me, so I decided to do it this way instead).

If you enjoy coffee or have coffee-loving friends or family than you must try this recipe!

Here are some pictures:

This is the cream cheese spread which smells like Starbucks!!!! They say it tastes good on bagels, so I'm going to give it a try as well! I'm sure they'll taste delightful! :)


This is a picture of the muffin batter - I bought one of those little boxes that have 8 little individual packets of instant coffee instead of buying an entire jar of instant coffee since I know we could never use that much instant coffee and it worked out quite well. I still have enough packets to make another batch of muffins.

Enjoy!!!

Tuesday, July 5, 2011

Summer Time Treats!

It's summertime and life around here has been full of Father's Day get-togethers, family gatherings, birthdays, and so much more! I'm busy working on my monthly menu for July at the moment and it's currently a slow process since I'm going through new recipes and looking for easy, yummy, and cheap summer meals!


Here is a recipe for some wonderful cool and refreshing ice cream cakes!


Ice Cream Cake


Here is the easy and delicious ice cream cake recipe....


Ice Cream Cake


1/2 gallon vanilla ice cream(I used the oreo cookie (cookies'n cream) ice cream for the reg. flavor cake, Bryers Sarah Lee cheesecake flavored icecream for the strawberry cheese cake flavored cake, and a peanut butter/chocolate swirl icecream for the peanut butter cake).


1 package Jell-O vanilla or cheesecake flavored pudding mix(I used chocolate pudding mix in my peanut butter flavored cake and vanilla and cheesecake flavored puddings for my other two cakes - puddings are optional and fat-free and sugar free puddings work fine too).


1 package Oreo cookies(Depending on what type of flavor you plan to make you can choose from the many different flavored cookies. I used the peanut butter and chocolate oreo cookies for my peanut butter flavored cake, I used the vanilla oreos for my strawberry cheese cake ice cream cake, and then used regular oreos for my orginal flavored ice cream cake).


1 container cool whip


1/2 stick of butter


Directions:Set ice cream out to soften. Crush Oreos and mix with about a half a stick of butter (sometimes more) and press on bottom of 9"x 11" pan. Mix softened ice cream with pudding mix. Spread over top of oreo crust. Top ice cream mixture with cool whip and put in freezer for a few hours.


Extras:

Regular flavor - nothing extra (you could drizzle some chocolate ice cream topping on it)

Peanut Butter - I drizzled carmel ice cream sauce on top of the finished cake.

Strawberry Cheesecake - I added strawberry ice cream topping and fresh strawberries.

Be creative and create your own unique flavored ice cream cake!


ENJOY!!!

Friday, June 10, 2011

Homemade Pizza!

Homemade pizza tastes great and is also a lot of fun to make - plus you can make and freeze them for later use.


Recipe for homemade pizza:

Dough


  • 1 pkg. (1T.) yeast

  • 1 cup warm water

  • 1 tsp. sugar

  • 1 tsp. salt

  • 2 T. cooking oil

  • 2 1/2 cups flour

Homemade Sauce (you can make your own sauce to top the pizza, or just buy a jar of pizza sauce from the store).


  • 8 oz. tomato paste

  • 1 tsp. of each of the following spices: oregano, seasoned salt, Italian seasoning, dried onion, dried green pepper

  • 1/8 tsp. garlic powder

  • Dash of pepper

  • 4 oz. mushrooms

  • 1 lb. sausage browned

  • 4 oz. sliced pepperoni

  • 2 cups shredded cheese

Dissolve yeast in warm water; add sugar, salt and oil. Add flour and mix well. Cover and let rise in a warm place at least 5 minutes. Combine paste and seasonings. Grease pan; flour fingers and spread crust. Pour sauce. Sprinkle last 6 ingredients on in order given. Bake at 425 degrees for 18-20 minutes.


ENJOY!!!!


Tuesday, June 7, 2011

Waffle Creations!

Cornbread Waffle with Chili


Did you know that you can make millions of things with waffles? You can enjoy waffles for breakfast, lunch, or supper! During strawberry season, we made waffles for breakfast and layered them with bright red, juicy strawberries and topped the stack with maple syrup!


Tonight, we had a yummy meal of cornbread waffles with chili. You mix up the cornbread together according to directions on the box, heat your waffle iron and you're ready to go! :) You drop the batter onto the hot iron just like you do when you're making regular waffles. Put together your chili just like you normally do and put it in a glass bowl or pan to serve. Set out your cream cheese and a small bowl of shredded cheddar cheese. Serve waffles warm! I love to place a waffle on my plate, scoop a spoonful of chili on top, a small amount of sour cream and top it with some cheese! This is a very easy, healthy, and cheap meal! A can of chili beans: 38 cents; a box of cornbread mix: 49 cents. I used a can of "chili without beans" which 68 cents instead of browning ground beef. I'm not sure how the portion of sour cream and cheese adds up - but it's really not that much $$.

Remember, waffles freeze really well - so why not make a batch to stick in the freezer to reheat when you need something quick to make on one of those days that you're feeling rushed for time?

If you're interested in another really good waffle recipe - try pumpkin waffles for breakfast! I love these waffles with melted butter and syrup! You can also freeze them for later use.

~Pumpkin Waffles~

Ingredients
1 cup plus 2 tablespoons all-purpose flour
2 tablespoons brown sugar
1 teaspoon ground cinnamon
1/2 teaspoon salt
1/2 teaspoon baking powder
1/4 teaspoon baking soda
2 eggs
1 cup milk
1/2 cup canned pumpkin
2 tablespoons butter, melted

Directions:
In a large bowl, combine the first six ingredients. In another bowl, combine the eggs, milk, pumpkin and butter; stir into dry ingredients just until combined.
Bake in a preheated waffle iron according to manufacturer’s directions until golden brown.

Enjoy!!!

What are some of your favorite waffle recipes?

Thursday, June 2, 2011

Kefir!


KEFIR


The things that look like little white popcorns are the kefir grains.


Have you ever been interested in growing something very healthy? I'm not talking about gardening outdoors, but I am talking about growing grains indoors. Well, it's a new venture that I've started and I wanted to share my experiments and findings with you all!


This is how you strain the kefir liquid to separate it from the grains.


This is what the kefir looks like when you 1st pour it into your strainer as you strain it.


This is what the kefir liquid looks like after you remove the strainer from on top of the bowl.


Putting your kefir grains into a glass jar before adding the milk


Kefir is a very easy-to-grow grain. It's basically a fermented milk drink that is very healthy for you. It is very rich in Vitamin B12, B1, and Vitamin K. It is an excellent source of biotin, a B Vitamin which aids the body’s assimilation of other B Vitamins, such as folic acid, pantothenic acid, and B12. The numerous benefits of maintaining adequate B vitamin intake range from regulation of the kidneys, liver and nervous system to helping relieve skin disorders, boost energy and promote longevity. The B Vitamins make your organs function better and boosts your immunity. They also help your stamina and helps you lose weight.

Drinking kefir is also good for MANY causes: It helps keep your colon clean and healthy, helps with constipation, fatigue, sleep disorders, ADHD (Attention Deficit Hyperactivity Disorder), depression, blood pressure, diabetes, ache, allergies, cholestrol, ulcers, hepatitis, diarrhea and it also helps to boost metabolism and aid in digestion. Drinking kefir can also help lactose intolerant people because of the helpful bateria that is found in kefir.

There are two types of kefir - milk and water. I'm doing the milk kefir since that is what I have right now. Milk kefir means you add milk to your grains to help them grow and ferment and water grains need water, sugar and/or lemon juice to help them grow.


To make kefir you'll need:


  • A glass jar (I use a large canning jar)


  • About 1 tablespoon of kefir culture


  • Milk

Place your kefir grains into the jar and then fill the jar with about 2 cups of milk (or until the jar is 2/3 full). Cover the jar with a cloth or a round coffee filter and put it somewhere away from sunlight. Let it sit for 12-48 hours. The less you let it sit the sweeter and thinner it'll be, but if you let it sit for a long period it'll be more sour and thicker. Also note that the temperature also makes a difference - in the summer months it's warm so the kefir will ferment faster. You can let your kefir grow slowly in the fridge for 5 or so days and it'll be thicker.


When you're ready to strain the keifr, use a wooden spoon and give it a little stir, then pour the jar into a plastic strainer (you do not want to use a metal one because that could kill your grains). Make sure you put a bowl under the strainer so you can catch all your kefir liquid. You now have kefir. Take the grains which are the little white popcorn looking things in the top of your strainer and place them into a clean jar, add 2 cups of milk, cover with a cloth or coffee filter and let it sit again for another day or so and repeat the process. Each time you do this you'll be getting more and more kefir grains. You can share your grains with friends and family.


If you search online you can find places that sell kefir grains and once you purchase them they will last you for years!


Here are some ways to use kefir:


Smoothies!
I made a kefir smoothie with frozen peaches and strawberries (I added a few scoops of strawberry flavored icecream to give it a little sweetener) - it was so good!


You can also put thick kefir on your baked potato like you would sour cream.


You can use your kefir milk liquid for making wonderful pancakes!

You can use kefir instead of buttermilk in recipes.


I have also found recipes for kefir cheese, cheesecake, and more online! I have yet to try making a kefir cheesecake or a cheese dip, but I hope to soon!


Random bit of info:
A long time ago, kefir was put into little bags and hung near a doorway, so that the bag would be knocked by anyone passing through the doorway to help keep the milk and kefir grains well mixed.